
Friday, May 30, 2014
Thursday, May 29, 2014
Bug Out Bag / Emergency Kit Planner
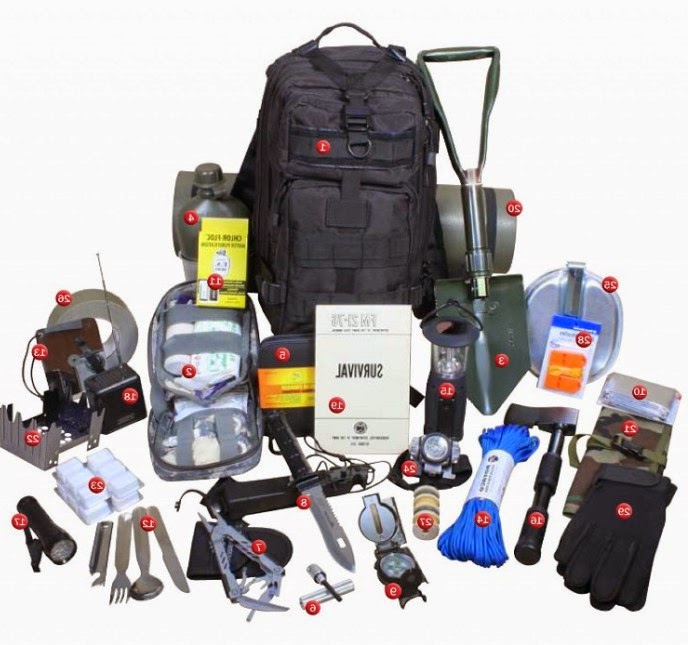 I took the suggestions you gave me yesterday [and some of my own] and compiled a "starter list" to help you think about what you might want to put into a bug-out bag. I will pass out a list at the beginning of class. What I want you to do today is to use Microsoft Word to compile a list of supplies you plan to put into an emergency backpack. Obviously you can't get all of this into a kit, but you will have to plan accordingly depending on what is most important to you.
Obviously you can add things to your list that aren't on my list, but try to keep your items realistic and think about the weight of what you are carrying. You don't know if you will be in a car, walking the road, or climbing over a mountain, so your job is to be the most prepared as possible for any circumstance.
Print your final list for me [which I will grade and return to you]. Your homework is to begin an Emergency Backpack with as many of your supplies as possible.
Tomorrow is the Senior Trip so we won't have a class project, but Portfolios are due next Wednesday. Have them organized, up-to-date, and ready to begin your new life/school/career/senior year.
Wednesday, May 28, 2014
Emergency Preparedness: Are You Ready?
 We have talked about the need to know basic first aid & CPR skills, but are you ready for an emergency? What if we have a major earthquake or an electrical storm that knocks power out for several weeks or wildfires that wipe out our neighborhood? Do you know what you would take with you if you had less than 5 minutes to decide?
Many people keep an emergency "Bug Out Bag" -- a bag / backpack with emergency supplies and important necessities that they can grab and go in a moments notice. The BOB is based on a military pack that soldiers keep at the ready, but is in use around the world for places prone to tornadoes, military strikes, wildfires, floods, hurricanes, etc.
Take 5 minutes and make a list of everything you would stuff into a Bug Out Bag if we were in danger of some sort of emergency scenario. Don't share your list or help others because we will be checking to see who does the best with this.-
What are some potential emergency scenarios? Obviously some are less likely than others, but Lake County has endured a variety of emergencies over the years. This winter parts of California dealt with phenomena that they never saw before -- three tornadoes in Chico within a weeks time, for example. So it's good to prepare for all sorts of emergencies whether or not we plan to actually HAVE an emergency in our area.
- Floods
- Fires
- Wind Storms
- Earthquake
- Volcano
- Hurricane
- Virus Outbreak / Plague
- Chemical Weapon Attack
- Nuclear Attack
- Tornado
- EMP
- Power Grid Failure
- Military Attack / Invasion
- Revolution / Power Shift
- Economic Collapse
- Insect Infestation
- Zombie Apocalypse
- Asteroid
- Blizzard
- Aliens
Obviously there is little [or no] chance of these things happening [especially around here], but being prepared for anything means you are prepared for everything.
Tuesday, May 27, 2014
Friday, May 23, 2014
Friday, May 16, 2014
Thursday, May 15, 2014
Finish Video Editing / Photo Story Projects
You have so far been given two video editing projects:
Tomorrow we will register for YouTube channels [if you don't already have one] and work on "branding". We will also look at "monetization". Try to think of something your channel would be about -- or a focus. Something people would remember and come back for.
- The sample video of the lady shopping for an ugly ring
- Your PhotoStory slideshow
Tomorrow we will register for YouTube channels [if you don't already have one] and work on "branding". We will also look at "monetization". Try to think of something your channel would be about -- or a focus. Something people would remember and come back for.
Monday, May 12, 2014
Photo Story

You can select numerous photographs [in order if you prefer], add background music, narrate your slideshow, etc. If you don't have music of your own, Photo Story has a build in "music creator" which will fit a variety of "moods".
Today we are going to create a slideshow using pictures you brought in for a Virtual Yearbook.
To create a Photo Story 3 project:

- Launch the Photo Story 3 application
- Check "Begin a new story" and click "Next"
- Click "Import Pictures"
- Select the pictures you would like to use in your project and click "Ok"
- Click "Next"
- If you don't wish to add titles/comments to your pictures, click "Next"
- If you don't want to record narration, click "Next"
- Click "Select Music" and choose the MP3 file you want to use for your background music
- Click "Next"
- Select the folder you want to save your work to (I suggest Thawspace) and click "Next"
- Photo Story 3 will now build your movie file
Wednesday, May 7, 2014
Photoshop: Collage
Today and tomorrow we are going to build a collage that we can use as a computer wallpaper. The collage must have a theme, include several images, have some sort of text (i.e. a title), and fit the dimensions of a typical computer screen.
 You will have today and tomorrow to build your collage.
Here are some examples of Photoshop collages:


 You will have today and tomorrow to build your collage.
- Create a new Photoshop document using your choice of the following dimensions: (Dimensions from W3Schools 9/19)
- 1366x768 (18.7% of computer screens use this resolution)
- 1024x768 (13% use this resolution)
- 1280x1024 (11.5%)
- 1280x800 (10.7%)
- 1440x900 (8.1%)
- Sometimes it's better to fill your canvas with a certain color (i.e. black, blue, or green) to serve as a base for your pasted images, although you can create some interesting collages by using a textured background or even an image (i.e. the example showing Asian writing).
- Begin finding images [within your theme as well as being classroom appropriate] and save them to a folder on your Thawspace or USB drive. Make sure the images are large enough that you don't have to stretch them on your canvas.
- Begin "pasting in" images and dragging them to the best fit on your canvas.
- You may want to use a soft, feathered brush as an eraser and soften the edges of your images.
- You may also want to try adjusting the opacity on some of your images [layers] to help the layers "melt together" better.
- You may even try a color gradient overlay with low opacity for some interesting effects.
- Choose a font that fits your theme, and place a title on your page.
- Choose a small font and put your name on your new artwork.
- Try some layer styles (drop shadows, bevel & emboss, stroke, etc.) to improve your text layer.
Here are some examples of Photoshop collages:


Tuesday, May 6, 2014
Photoshop: Recoloring
Today we will continue playing with the "Replace Color" tool:
Step I: Getting Started


Step II: Making a "Warhol Grid"


Step I: Getting Started
- Click on one of the sample images below to view it full screen
- Copy the image
- Open PhotoShop and create a New Document
- Paste the image


- Go to IMAGE > CANVAS SIZE
- Change "Inches" to "Percent"
- Change BOTH Width and Height to 200 [percent].
- Click the "Upper-Left" Arrow
- Click OK
- Click VIEW > FIT ON SCREEN
- Paste another copy of your picture
- Use the arrow to drag the picture to the upper-right corner
- Paste another copy of your picture
- Use the arrow to drag the picture to the lower-left corner
- Paste another copy of your picture
- Use the arrow to drag the picture to the lower-right corner.
Step III: Changing Colors
- Select the layer that you want to adjust (top-right, bottom-left, and bottom-right)
- Go to IMAGE > ADJUSTMENTS > REPLACE COLOR
- Use the Dropper tool to click on one of the bright colors
- Hold Shift and select other shades of that color
- Drag the "HUE" slider left or right to adjust the color
- Repeat steps 1-5 for the other two squares.

Step IV: Finishing
- Add your name to your image
- Save your image to ThawSpace as a PSD
- Save your image to ThawSpace again -- this time as a JPG
- Log in to your portfolio (Blogger) page
- Create a New Post and insert your JPG picture
- Write a quick summary of the project and what you did to get the look you came up with
Saturday, May 3, 2014
Friday, May 2, 2014
Photoshop: Photo Manipulation
Assignment: We have accepted an assignment from a client to take a dull, scanned photograph and improve it for use in a poster, brochure, web site, etc. The client has scanned a photograph of a gondola, but they think it is too hazy... and they don't like the speedboat in the center of the picture... and "the colors are a little blah". We will use PhotoShop to correct these issues... and more.
Photoshop Tools/Options Used:

(Right-click each image and save to your computer, then open them in Photoshop.)


Part I: We will begin with the Gondola picture (p_start.psd):Photoshop Tools/Options Used:

- Ruler
- Rotate Canvas
- Crop
- Levels
- Clone Stamp
- Dodge
- Burn
- Replace Color
- Magic Wand
- Paste Into
- Free Transform
(Right-click each image and save to your computer, then open them in Photoshop.)
- Select VIEW > FIT ON SCREEN (shortcut is CTRL+0) to see the image as large as possible
- Select the RULER tool (sometimes it's hidden under the EYEDROPPER) -- a shortcut is SHIFT+I which toggles through that toolset.
- Drag the ruler along an edge that should be straight (i.e. the edge of the tower).
- Select IMAGE > ROTATE CANVAS > ARBITRARY...
- A suggested rotation is already in place based on your ruler line (this tool is trying to make the ruler line vertical or horizonal)... so click OK.
- Use the RECTANGULAR MARQUEE tool (the box shape) to select as much of the picture as possible without including the black border (it's okay if you don't get all of the photo in the square).
- Select IMAGE > CROP
- Select VIEW > FIT ON SCREEN (again, to see the maximum image size)
- Select IMAGES > ADJUSTMENTS > LEVELS
- Drag the "black triangle" in toward the very beginning of the "mountain range" -- and do the same for the "white triangle" (click the "Preview" box to toggle this change to preview what it is doing) then click OK.
- You now have a brightened, cropped image to work with for the next part.
- Click the CLONE STAMP tool
- Move your pointer over to a clear area of water -- about the same distance/depth as your motorboat (i.e. somewhere in the same horizontal line) and ALT+CLICK.
- Move your mouse over to the center of the motorboat and slowly paint over the boat. Notice the "+" shape where the CLONE STAMP is copying from.
- Click the DODGE tool (it looks like a black pushpin) and set the Range for HIGHLIGHTS and the Exposure to around 10%.
- Adjust your brush size as necessary with the [ and ] keys.
- Brush over the red and white striped tarp and notice how the highlights are getting brighter. Try this on other tarps and the side of the boat which seems to get shinier.
- Click the BURN tool (it looks like a hand pinching and is found under the DODGE tool) and set the Range for SHADOWS and the Exposure to around 5%.
- Adjust your brush size as necessary with the [ and ] keys.
- Brush over the boats/tarps just to get a little contrast.
- Use the ZOOM tool (it looks like a magnifying glass) to zoom in on the orange tarp -- making sure you can see the entire thing.
- Use the LASSO tool and draw around the orange tarp (making a selection)
- Select IMAGE > ADJUSTMENT > REPLACE COLOR
- Click on the orange part of the orange tarp. You should see a faint "mask" of the orange shape appear in the Replace Color box.
- Hold down the SHIFT key and Click and Drag around the orange tarp trying to select ONLY the orange areas. If you over-select (i.e. you accidentally go into the black) you can start this step over.
- When you feel like you have a nice, sharp "mask" of the orange tarps shape, drag the HUE slider left and right. Notice the colors changing on your image.
- If you adjust the SATURATION slider and the LIGHTNESS slider, you can actually match the colors of the other tarps on the boat.
- Open the Clouds picture (p_clouds.psd).
- Click on SELECT > ALL (or do CTRL+A)
- Select EDIT > COPY (or do CTRL+C)
- Go back to your Gondola picture.
- Click the MAGIC WAND tool (SHIFT+W toggles this)
- Click in one of the "gray" areas of the sky and notice how it selects some of the building tops. We don't want that.
- Drop your TOLERANCE down to 10 and see how that works. Notice that it [probably] doesn't select the entire piece. We can compensate for that by holding SHIFT and clicking in the "unselected" areas.
- Continue SHIFT-Clicking the other "gray" areas of the sky throughout the picture.
- Select EDIT > PASTE INTO (not PASTE)
- Notice how ugly and unnatural this looks? Don't worry -- go over to the OPACITY setting (above your LAYERS) and drag that down until it looks natural. Mine is about 37% [this time].
- When you are satisfied with your final product, select LAYER > FLATTEN IMAGE.

- Go to IMAGE > CANVAS SIZE
- Change "inches" to percent and change the width (since this is a picture that is taller than it is wide, a side-by-side comparison works best -- so we will adjust the width) and change the 100 to 200 (making it twice the width).
- Click on the Right Arrow (this means you want your current picture -- the "after" -- to be on the right) and click OK.
- Copy your original image (in this case, p_start.psd) and Paste it into your finished image. Use the MOVE tool (the black arrow) to drag it to the left side.
- You may want to use your FREE TRANSFORM to rotate and resize the original so it fits better.
- Add your name to the finished image.
- Save your completed file as a JPEG image to your Thawspace.
- Go to your Blog (http://www.blogger.com/) and sign into your account.
- Click New Post and make sure "Compose" is selected.
- Click the IMAGE/PICTURE button.
- Browse for your picture (from your Thawspace).
- Add a description about the steps you completed or the process you used in putting this together. You could even add the reason you did the project (e.g. A virtual client wanted you to clean up an image to use for print/online media).
- Click PUBLISH POST.
- Click VIEW BLOG.
Thursday, May 1, 2014
Photoshop: Colorize a Photo
Today we will be learning to colorize a black and white image. The image we are starting with, however, is already in color. What we will do is take this image into PhotoShop, convert it to black & white, then colorize it.
1. Click on the image (below) to view it full-size.
 2. Right-click and save the image to your folder.
3. Open the image in PhotoShop.
4. Convert it to Black & White by going to: IMAGE > MODE > GRAYSCALE
5. Balance it by going to: IMAGE > ADJUSTMENTS > AUTO CONTRAST
6. Convert the image back to RGB Color by going to: IMAGE > MODE > RGB COLOR
7. Create a new layer: LAYER > NEW > LAYER
8. Pick a bright color (pink, blue, red, etc.)
9. Choose a soft (feathered) brush and paint on your new layer over an object (hat, pants, overalls, etc.). Don't worry about the bright, ugly color because we're going to adjust that in the next step.
10. Next, adjust the opacity (transparency) of your painted layer by clicking the arrow next to OPACITY above the Layer. Drag the arrow left or right to adjust the opacity.
This is a quick example of the project:

Here are a few examples of adding color to a black & white photograph to create different effects:


If [for some reason] you don't see your layers, click F7.
Also, if you have access to YouTube you can check out this video tutorial that I put together a few years ago. It's on a Macintosh, but the concepts are the same:
1. Click on the image (below) to view it full-size.
4. Convert it to Black & White by going to: IMAGE > MODE > GRAYSCALE
5. Balance it by going to: IMAGE > ADJUSTMENTS > AUTO CONTRAST
6. Convert the image back to RGB Color by going to: IMAGE > MODE > RGB COLOR
7. Create a new layer: LAYER > NEW > LAYER
8. Pick a bright color (pink, blue, red, etc.)
9. Choose a soft (feathered) brush and paint on your new layer over an object (hat, pants, overalls, etc.). Don't worry about the bright, ugly color because we're going to adjust that in the next step.
10. Next, adjust the opacity (transparency) of your painted layer by clicking the arrow next to OPACITY above the Layer. Drag the arrow left or right to adjust the opacity.
This is a quick example of the project:

Here are a few examples of adding color to a black & white photograph to create different effects:


Also, if you have access to YouTube you can check out this video tutorial that I put together a few years ago. It's on a Macintosh, but the concepts are the same:
Subscribe to:
Comments (Atom)