Monday, March 2, 2015

Extra Project: Upcoming Baby Project

I just wanted to give you all a "heads-up" that the "Flour Baby" / "Sugar Baby" / "Maza Baby" project is coming up next week.  You will build "babies" that you will carry with you for the entire week as if it was your actual child.

All materials are due in class by FRIDAY, March 6th.  If we are not here on Friday, you will need to bring them on Monday, 3/9 fully ready.  You will need to collect a few things by then:
  • First and foremost, a 5-10 pound sack of sugar, flour, or maza (corn meal).  Checking in at a couple stores, I saw 5 lb. bags of sugar and flour for about $2.39.  If you care for your "baby" well enough, you can still use the flour or sugar when you are done with the project.

  • Next you will need to bring a color picture to use as the "baby's" face.  You can find them in parenting magazines, advertisements, or on the Internet.  Try a Google Search (example) and print them on a decent color printer.  You can use some time today to look for these.
  • You will also want to bring something to clothe the baby in.  I recommend a cheap "onesie" that you can pick up at a garage sale, a thrift shop, etc.  You may even know someone with a baby who has some old clothes they want to get rid of.  (Extra credit if you can bring extra's for your classmates)
  • You will need a basket, car seat, stroller, sling, or other baby carrying device.  If you don't want to hold the baby all day during school, you will want something that you can sit quietly under [or along side] your desk.
  • One diaper [unused].  We will go over the basics of diapering your "baby" in class.  If you are not familiar with the difficulty of disposable diapers, you may want to bring an extra.  (Extra credit if you bring extra's for your classmates)
Here are a couple examples from last year that I really liked -- the "parents" of these babies were a couple so their babies became "twins":
  • Optional:  Items to decorate your "baby" such as doll arms/legs, pacifier, baby blanket, markers, construction paper, etc.  Here are a few examples of creative approaches to this project:

Thursday, June 5, 2014

Final Project Part 2: Block Letter

Rather than have people bring their portfolio's back in, I have opted to give a couple simple assignments to make sure you have the skills down.

You will be writing a block letter to me from yourself:

My address:
Robert Griffith
235 Harness Hollow Lane
Briceville, TN 37710
I want you to do the following paragraphs:
  1. What sorts of things did you enjoy learning most in Life Skills & Personal Finance?
  2. What would you change about the class if you were teaching it?
  3. What grade do you believe you deserve in this class.  Why?
  4. What are your plans for the future?
Don't forget to include the closing (i.e. Sincerely,) and your printed name with a space between those to sign your name.

Tuesday, June 3, 2014

Perseverance...

Sometimes when you really want something, you need to fight for it.  Push and scratch and grab for what you want.  Many times it takes a LOT of hard work and a tenacity that only someone committed to a goal can achieve.

Here are a couple examples using skateboarding:

First, this 9-year old skater tried 75-times to land a 540—an aerial spin that involves one and a half midair rotations. Each time, the stubborn kid picked herself up and used the fail as motivation to get it right next time. Fun fact: She says she cannot yet ride a bike.
Next, this uncut video of Chris Cole Wallenberg trying to land this jump shows how much work really goes into making an epic skateboarding video.  If you have ever watched a professional in a video clip and you ask yourself, "How the (*&^(*^ does he/she always LAND those?!"  The answer is -- they don't.  But what he demonstrates here is the tenacity to NOT give up.
My point for showing these videos today is NOT that I want you to be a skateboarder, but that I want you to go after your goals as if you were in a race for a million dollars.  Reach and stretch and never give up.  You only fail when you stop trying.

End of the Year Music Video #9: Live Like We're Dying by The Script

Friday, May 30, 2014

Thursday, May 29, 2014

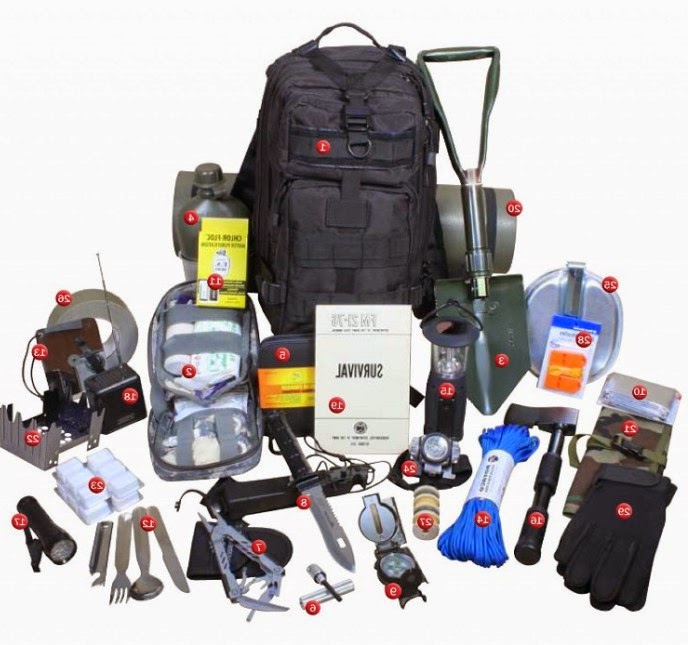
Bug Out Bag / Emergency Kit Planner

I took the suggestions you gave me yesterday [and some of my own] and compiled a "starter list" to help you think about what you might want to put into a bug-out bag.  I will pass out a list at the beginning of class.  What I want you to do today is to use Microsoft Word to compile a list of supplies you plan to put into an emergency backpack.  Obviously you can't get all of this into a kit, but you will have to plan accordingly depending on what is most important to you.

Obviously you can add things to your list that aren't on my list, but try to keep your items realistic and think about the weight of what you are carrying.  You don't know if you will be in a car, walking the road, or climbing over a mountain, so your job is to be the most prepared as possible for any circumstance.

Print your final list for me [which I will grade and return to you].  Your homework is to begin an Emergency Backpack with as many of your supplies as possible.

Tomorrow is the Senior Trip so we won't have a class project, but Portfolios are due next Wednesday.  Have them organized, up-to-date, and ready to begin your new life/school/career/senior year.

End of the Year Music Video #6: Photograph by Nickelback

Wednesday, May 28, 2014

Emergency Preparedness: Are You Ready?

We have talked about the need to know basic first aid & CPR skills, but are you ready for an emergency?  What if we have a major earthquake or an electrical storm that knocks power out for several weeks or wildfires that wipe out our neighborhood?  Do you know what you would take with you if you had less than 5 minutes to decide?

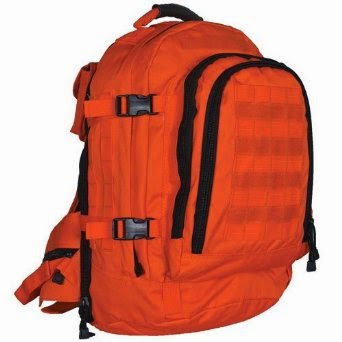
Many people keep an emergency "Bug Out Bag" -- a bag / backpack with emergency supplies and important necessities that they can grab and go in a moments notice.  The BOB is based on a military pack that soldiers keep at the ready, but is in use around the world for places prone to tornadoes, military strikes, wildfires, floods, hurricanes, etc.

Take 5 minutes and make a list of everything you would stuff into a Bug Out Bag if we were in danger of some sort of emergency scenario.  Don't share your list or help others because we will be checking to see who does the best with this.-

What are some potential emergency scenarios?  Obviously some are less likely than others, but Lake County has endured a variety of emergencies over the years.  This winter parts of California dealt with phenomena that they never saw before -- three tornadoes in Chico within a weeks time, for example.  So it's good to prepare for all sorts of emergencies whether or not we plan to actually HAVE an emergency in our area.

  • Floods
  • Fires
  • Wind Storms
  • Earthquake
  • Volcano
  • Hurricane
  • Virus Outbreak / Plague
  • Chemical Weapon Attack
  • Nuclear Attack
  • Tornado
  • EMP
  • Power Grid Failure
  • Military Attack / Invasion
  • Revolution / Power Shift
  • Economic Collapse
  • Insect Infestation
  • Zombie Apocalypse
  • Asteroid
  • Blizzard
  • Aliens
Obviously there is little [or no] chance of these things happening [especially around here], but being prepared for anything means you are prepared for everything.

End of the Year Music Video #5: Slip on By by Austin Webb

Thursday, May 15, 2014

Finish Video Editing / Photo Story Projects

You have so far been given two video editing projects:
  1. The sample video of the lady shopping for an ugly ring
  2. Your PhotoStory slideshow
Finish editing those today by doing music, titles, end credits, etc.

Tomorrow we will register for YouTube channels [if you don't already have one] and work on "branding".  We will also look at "monetization".  Try to think of something your channel would be about -- or a focus.  Something people would remember and come back for.

End of the Year Music Video #1: You're Gonna Miss This

Monday, May 12, 2014

Photo Story

Today we're going to begin using a free program (you can download it here) called Photo Story 3.  Photo Story 3 is a free presentation tool for creating digital stories with photos, text, transitions, audio narration and background music. It is a modern day version of show and tell or story telling.

You can select numerous photographs [in order if you prefer], add background music, narrate your slideshow, etc.  If you don't have music of your own, Photo Story has a build in "music creator" which will fit a variety of "moods".

Today we are going to create a slideshow using pictures you brought in for a Virtual Yearbook.

To create a Photo Story 3 project:
  • Launch the Photo Story 3 application
  • Check "Begin a new story" and click "Next"
  • Click "Import Pictures"
  • Select the pictures you would like to use in your project and click "Ok"
  • Click "Next"
  • If you don't wish to add titles/comments to your pictures, click "Next"
  • If you don't want to record narration, click "Next"
  • Click "Select Music" and choose the MP3 file you want to use for your background music
  • Click "Next"
  • Select the folder you want to save your work to (I suggest Thawspace) and click "Next"
  • Photo Story 3 will now build your movie file

Wednesday, May 7, 2014

Photoshop: Collage

Today and tomorrow we are going to build a collage that we can use as a computer wallpaper. The collage must have a theme, include several images, have some sort of text (i.e. a title), and fit the dimensions of a typical computer screen.

You will have today and tomorrow to build your collage.
  1. Create a new Photoshop document using your choice of the following dimensions:  (Dimensions from W3Schools 9/19)
    1. 1366x768 (18.7% of computer screens use this resolution) 
    2. 1024x768  (13% use this resolution)
    3. 1280x1024  (11.5%)
    4. 1280x800 (10.7%)
    5. 1440x900 (8.1%)
  2. Sometimes it's better to fill your canvas with a certain color (i.e. black, blue, or green) to serve as a base for your pasted images, although you can create some interesting collages by using a textured background or even an image (i.e. the example showing Asian writing).
  3. Begin finding images [within your theme as well as being classroom appropriate] and save them to a folder on your Thawspace or USB drive.  Make sure the images are large enough that you don't have to stretch them on your canvas.
  4. Begin "pasting in" images and dragging them to the best fit on your canvas.
  5. You may want to use a soft, feathered brush as an eraser and soften the edges of your images.
  6. You may also want to try adjusting the opacity on some of your images [layers] to help the layers "melt together" better.
  7. You may even try a color gradient overlay with low opacity for some interesting effects.
  8. Choose a font that fits your theme, and place a title on your page.
  9. Choose a small font and put your name on your new artwork.
  10. Try some layer styles (drop shadows, bevel & emboss, stroke, etc.) to improve your text layer.
Finally, make sure you save your file as a PSD (Photoshop Document) as well as a JPEG, then upload the JPEG to your Blogger portfolio.

Here are some examples of Photoshop collages:

Tuesday, May 6, 2014

Being Connected